Pay attention to the treadmill belt cost, too. Sometimes, replacing the belt can be a DIY task if you’re comfortable with basic tools and have a little time. If you go the replace belt DIY route, make sure to check your manual for specific instructions. But if you’re not keen on getting your hands dirty, calling in a pro might be a good move. Just weigh the repair treadmill worth it factor against the cost of a new machine.
Speaking of timing, understand the belt replacement frequency that works for your use. A good rule of thumb is the 3-30 rule: if you run for approximately 30 minutes, three times a week, you’re in that sweet spot for when to check your belt condition. If you’re doing more intense workouts, you might need to step up your inspection game.
Remember, using a properly lubricated treadmill can affect the lifespan of your belt. Regular treadmill lubrication keeps everything moving smoothly, which means less friction and wear and tear. And if you start to feel your treadmill jerking or stuttering, that could be a sign of a worn belt or other issues. It’s essential to address these indicators, especially if you’re dealing with conditions like treadmill & knee arthritis.
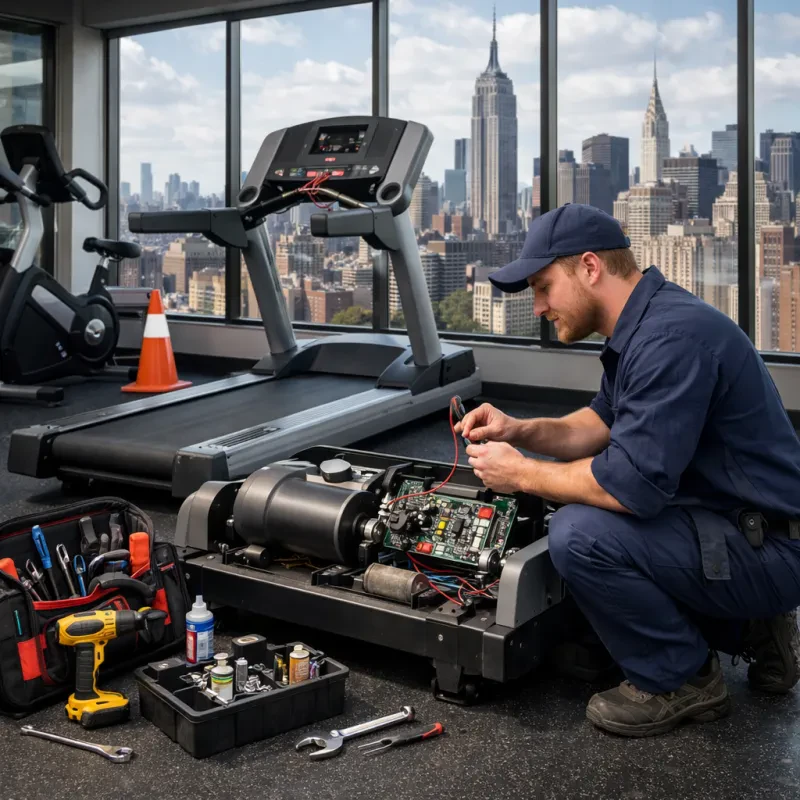
DIY Steps for Treadmill Belt Replacement
Replacing your treadmill belt can sound intimidating, but it’s totally doable with a little patience. If you're ready to take on the challenge, follow these simple steps. First, gather your tools: a screwdriver, a wrench, and a new treadmill belt that fits your machine. Make sure to check the treadmill belt cost ahead of time to see if it fits your budget.
Start by unplugging your treadmill. Safety first! Then, remove the motor cover with your screwdriver. This is where you can get a good look at the screws holding the belt in place. Loosen these screws, but don’t remove them yet. You’ll want to loosen them just enough to slide the old belt off and the new one on.
As you replace the belt DIY, pay attention to belt replacement signs. If you notice any tears or uneven wear on the old belt, it’s definitely time for a new one. Once your new belt is in place, adjust the tension according to the 3-30 rule. This means running your treadmill for 3 minutes and then seeing if the belt slips. If it does, tighten it slightly. A well-adjusted belt helps prevent issues like treadmill jerking causes later on.
Finally, don’t forget to lubricate your new belt. Treadmill lubrication effects are huge! Proper maintenance can extend the life of your new belt, saving you from frequent belt replacement frequency. If you have any knee problems, like knee arthritis, keeping your treadmill in tip-top shape is extra important. Your knees will thank you during workouts!

Portable Blackout Curtain Shade with Suction Cups
Block out distractions and create your ideal workout space anytime, anywhere
Product information
$19.99
Product Review Score
4.61 out of 5 stars
50 reviewsProduct links
Finding Professional Help for Belt Issues
If you've been keeping an eye on your treadmill and noticing signs that it might need some attention, you might be wondering if it’s time to find professional help. First, let’s look at the belt replacement signs. If your treadmill belt is slipping, making noise, or showing wear, it might be time to seek assistance. A professional can help confirm if replacing the belt is worth it, especially when you consider the treadmill belt cost versus the age and condition of your machine.
While replace belt DIY is an option, not everyone feels comfortable diving into repairs. If you worry about getting it right or just want to avoid any potential issues, hiring a pro is a smart choice. They’ll not only replace the belt but can also check for other problems and give your machine a good tune-up. This is especially helpful for those who struggle with treadmill & knee arthritis, as an improperly maintained machine can lead to discomfort during workouts.
When figuring out the belt replacement frequency, consider your usage. If you're a regular treadmill user, sticking to the 3-30 rule can be a good tip. Check your belt every three months if you use it daily, while those who use it less often should inspect it every 30 sessions. Follow these guidelines to prevent excessive wear and ensure longevity, making a pro visit more predictable.
Lastly, if your treadmill is older, say around the 20-year mark, ask yourself if a repair treadmill worth it or if you need a new machine. Professionals can guide you through the decision-making process and tell you if investing in a repair will extend its life or if it’s time to cut your losses. They'll also give insights into treadmill lubrication effects, which can keep your machine running smooth and reduce the need for frequent repairs.
Cost Considerations for Treadmill Repairs
When your treadmill starts acting up, especially when it comes to the belt, it's time to weigh your options. Understanding the treadmill belt cost is crucial. If your treadmill is newer or in pretty good shape, it might be worth investing in repairs. But if it’s on the older side, you might reconsider. Think about the belt replacement frequency—generally, you should expect to replace it every 1500 to 2000 miles, so keep track of your usage.
Watch for belt replacement signs like cracking, slipping, or unusual noises. If you notice any of these while using your treadmill, it’s probably time to get that belt replaced. Whether you choose to replace belt DIY or call in a pro, consider the age of your treadmill. The 3-30 rule often applies here: if your treadmill is over 3 years old and the repair costs are more than 30% of its value, you might want to think about ditching it and getting a new model.
For those dealing with treadmill & knee arthritis, the last thing you want is a faulty machine. A smooth-running treadmill can make those workouts easier on your joints. Regular treadmill lubrication effects can extend the life of your belt and keep everything running smoothly, which is super important for long-term health.
As for whether it’s worth it to repair treadmill issues, consider how often you use it. If you’re a daily user, investing in repairs can make sense, especially if you’ve got a 20yr treadmill. But if it's been collecting dust, it might be time to move on. Always weigh the costs and benefits, and don’t forget to factor in any jerking you’ve experienced—those treadmill jerking causes can stem from a worn-out belt, and nobody wants that disrupting their workout routine!